
Digital Gift Cards allow your organization to sell and redeem gift cards directly through XTru. Gift cards can be purchased online (via your XTru Web Portal), delivered digitally to the recipient, and redeemed as a payment method for eligible purchases (via XTru Web, Kiosk, MPOS, Advance Sales, POS).
Setting up Digital Gift Cards involves several areas of XTru. Each area controls a different part of the gift card experience:
- System Setup - Configure the overall gift card settings, including purchase surcharges, terms and conditions, expiration, minimum and maximum amounts, instructions for use, security settings, and integration settings. Navigate to System > Settings > Gift Cards.
- Template Setup - Customize the visual appearance of the digital gift card, including its overall look and feel. Navigate to Digital Passes > Templates > Gift Card Templates.
- Messaging Setup - If desired, configure a custom email template for gift card recipients. You may also use the System Default.
- Product Setup - Create the gift card products that customers can purchase. Different products can have their own suggested amounts, card designs, and confirmation emails. For example, you may set up a Happy Birthday Gift Card, a Holiday Card, or a General Card. Navigate to Gift Card Setup OR if Merchandise is enabled, Merchandise Setup > Gift Card Setup.
- Payment Setup - Select and configure the payment method used when customers redeem a gift card. Navigate to System > Payment Setup > Payment Methods. Note that you will need to create your dedicated payment method in Altru first.
- Web Setup - Add the Digital Gift Card purchase page to your web portal so customers can browse and purchase gift cards online.
These settings work together to create the complete digital gift card experience, from purchase and delivery through redemption.
System Setup
System Setup controls the overall behavior and rules for Digital Gift Cards. Configure these settings before creating your gift card products. Navigate to System > Settings > Gift Cards:
- Surcharge: Choose whether to charge an additional fee when a gift card is purchased, and select either a flat fee or percentage.
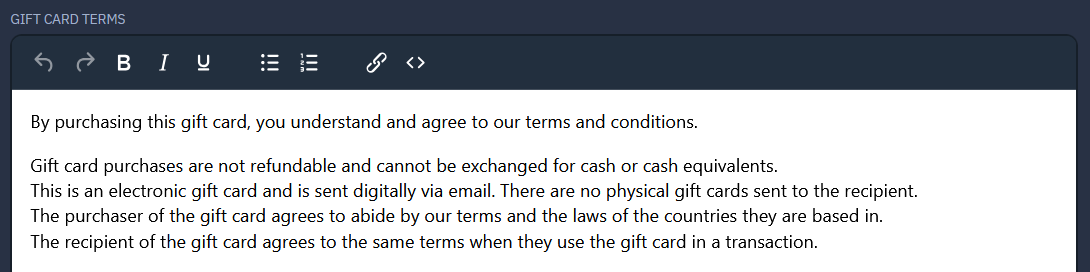
- Gift Card Terms: Enter the terms and conditions customers must agree to when purchasing a gift card. We recommend researching your federal and state laws when defining these terms. Example below.
- Expiry Period: If desired, enable an expiration period for newly purchased gift cards. Gift cards default to having no expiration. Most state and federal laws have a minimum timeframe for expiration.
- Minimum/Maximum Purchase Amount: Set limits on the amount customers can load onto a gift card, if applicable.
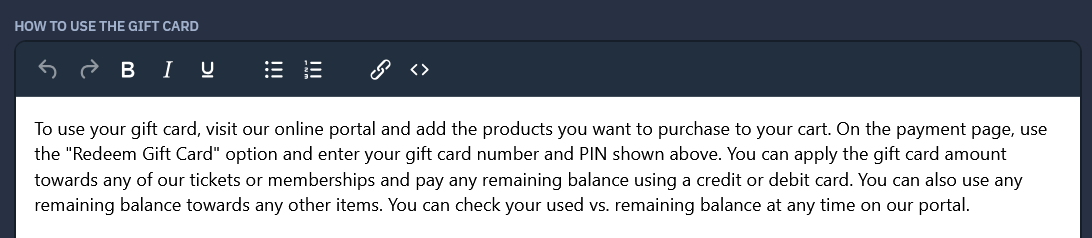
- How to Use: The information entered here is provided to gift card recipients via email with their card information, and should explain how and where the gift card can be redeemed. Example below.
- Security Settings: Set the maximum number of failed PIN attempts and the length of the PIN lockout period.
- Donation Settings: If desired, allow customers to donate a remaining small gift card balance. You may set this to apply to the designation of your choice.
- Integration Settings: Required for Altru integration; select the designation to apply to gift card purchases and the designation used for surcharges (if applicable).
Template Setup
Digital Gift Card Templates control the appearance and information displayed on a gift card when it is added to a customer's digital wallet. Templates can be customized with your organization's branding and the gift card information you want recipients to see.
Create a Gift Card Template
- Navigate to Digital Passes > Templates > Gift Card Templates.
- Select Create Template.
- Enter a Description. This appears on the back of iOS wallet cards.
- Enter Logo Text. This appears at the top of the gift card in the digital wallet.
- Configure the Appearance of the card, including:
- Colors
- Template icon
- Logo
- Thumbnail images
- Configure the Pass Front and Pass Back by selecting the data fields you want to display. Available information can include:
- Gift card number
- PIN
- Balance
- Recipient (To)
- Sender (From)
- Message from the giver
- Configure Relevance settings if you want to use geofencing. Enter the latitude and longitude of a location, and the gift card will be displayed on the recipient's device lock screen when they are within approximately 100 feet of those coordinates.
- Save the template.
Your templates may then be selected for use during Product Setup (outlined above).
Messaging Setup
Messaging Setup controls the email sent to recipients when a digital gift card is delivered. You can use the System Default Gift Card Email (see below) or create a custom email template to match your organization's branding and messaging.
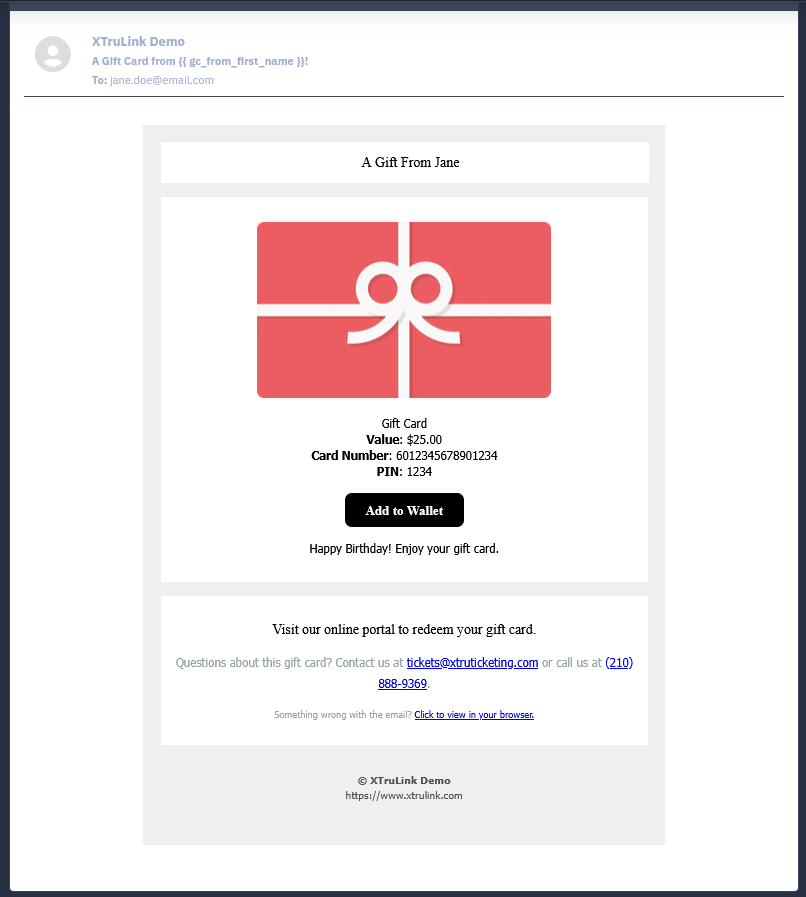
Navigate to Messaging Service > Templates to view the system default template.
Create a Custom Gift Card Email
- Navigate to Messaging Service > Templates.
- Select Create New Message Template.
- Enter a Name and Subject for the email.
- For Message Type, select Email.
- For Template Type, select Gift Card Delivery Method.
- Create your email using the available gift card fields.
- Save the template.
The following fields are required in a Gift Card Delivery Method template:
- Gift card amount
- Gift card number
- PIN
- Wallet link
- Instructions for use
You can also include additional information, such as the giver's name and the message from the giver.
Product Setup
Gift card products define the different gift card options customers can choose from when making a purchase. You can create as many gift card products as needed—for example, a general gift card, a Happy Birthday gift card, or a Holiday gift card. Each product can have its own amounts, recipient email, and digital card design. The designation associated with each product type will be the same, selected in System Setup.
Create a Gift Card Product
- Navigate to Gift Card Setup OR if Merchandise is enabled, Merchandise Setup > Gift Card Setup.
- Select Create a Gift Card to create a new product.
- Enter a Name for the gift card and set its Active status.
- Add Preset Amounts that customers can select when purchasing the gift card. These can be common denominations such as $25, $50, or $100.
- Choose whether to allow customers to enter a Custom Amount. If enabled, customers can enter an amount within the minimum and maximum limits configured in System Setup.
- Select the Delivery Email Template. This determines the email sent to the gift card recipient and can be customized for the specific gift card product.
- Select the Digital Gift Card Template. This determines the appearance of the digital gift card the recipient receives.
- Save the gift card product.
Gift Card Products vs. Gift Card Templates
Gift card products and templates serve different purposes:
- Gift Card Product: The option customers select when purchasing a gift card, including its name, available amounts, email, and associated card design.
- Digital Gift Card Template: The visual design of the actual digital gift card. Multiple products can use the same template, or each product can have its own unique design.
Payment Setup
If your organization uses Altru, you must first create a payment method in Altru for gift card redemptions. This payment method is then mapped to the Gift Card payment method in XTru.
Configure the Gift Card Payment Method
In Altru:
- Navigate to Administration > Code Tables > Category: Revenue > Other Payment Method Type.
- Click Add and provide the name for your new payment method, such as XTru Gift Card.
- Click Save.
In XTru:
- If you just created your payment method, first navigate to System > Settings > Data Sync Manager and sync the Non-essential Data Sync. You do not need to do this if your payment method has existed in Altru for more than 24 hours.
- Now navigate to System > Payment Setup > Payment Methods.
- Locate the Gift Card payment method and select Edit.
- In the Payment Type dropdown, select the payment method you created in Altru.
- Save your changes.
Once configured, XTru will use the mapped Altru payment method when a customer redeems a digital gift card.
Web Setup
Web Setup adds a Digital Gift Card purchase page to your online sales portal. Most of the gift card settings on this page are pulled from the configuration completed in System Setup and Product Setup. The Web Setup step primarily determines how the gift card is presented on your website and which gift card product customers can purchase.
Add a Gift Card Purchase Page
- Navigate to Online Sales > Portals and select Edit Portal for the portal where you want to offer gift cards.
- Select Menu.
- Create a new Menu Area, or select an existing Menu Area where you want the gift card page to appear.
- Select Pages next to your Menu Area and click Create Page.
- For Page Type, select Gift Card.
- Configure the page settings:
- Image: Add an image to display on the gift card purchase page.
- Page Title: Enter the title customers will see on the page.
- Description: Add a short description or endorsement of the gift card.
- Select the Gift Card Product you want to associate with the page. This is one of the products created during Product Setup.
- Save the page.
Once the page is added to the portal menu, customers can access it through your website and purchase the associated digital gift card product. We recommend keeping the page hidden and testing your gift card setup before you go live to customers. Here is a sample page from our demo site.
Tip: If you have created multiple gift card products—for example, a Birthday Gift Card and a Holiday Gift Card—you can create separate web pages for each product and give each page its own image, title, and description.